To “optimize web images” means striving to achieve the optimum quality (best looking) and the optimum download speed (smallest file size) at the same time. This is challenging because best looking and smallest file size work directly against each other. Modern high-resolution (a.k.a. Retina, HD, high density, high-DPI) monitors exacerbate this challenge since they require larger image sizes to look good. This post will give you step-by-step tips to achieve the best results. With a little Photoshop wizardry, the art and science of image optimization can be mastered.
Why does image optimization matter?
Poorly optimized web images are common problems on many websites. They contribute to an unsatisfactory user experience, either because they load slowly or they don’t look good. What’s more, since overly large image files are primary contributors to slow website load times, they lead to sites being penalized by Google in search rankings.
A brief technical prelude
First, throughout this post when I refer to “file size” I mean how big an image is in kilobytes or megabytes (sometimes called the “K-weight”), as opposed to the physical pixel dimensions of the image. If that’s Greek to you, please study up here before you read further.
Secondly, you’ll need Adobe Photoshop to optimize images according to the tips I’m providing. Photoshop’s “Save For Web” feature is a powerful tool. Even though Save For Web has been in place for over a decade, if you are having a hard time finding it, note that with the 2015 release of Photoshop CC, the File > Save For Web option was moved to File > Export > Save For Web (Legacy) alongside newer export options. It still has all the same features as the original Save For Web. Okay, enough introduction, let’s get to it.
The good, the bad and the ugly
The images below show four ways that the same image can be prepared for placement on a web page. Two of them have common problems, and the third is done properly for standard resolution monitors, the fourth is optimized correctly for high-resolution monitors. This article will explain how to prepare images for your website to get them looking good with the smallest file sizes possible so your pages load quickly and look great.
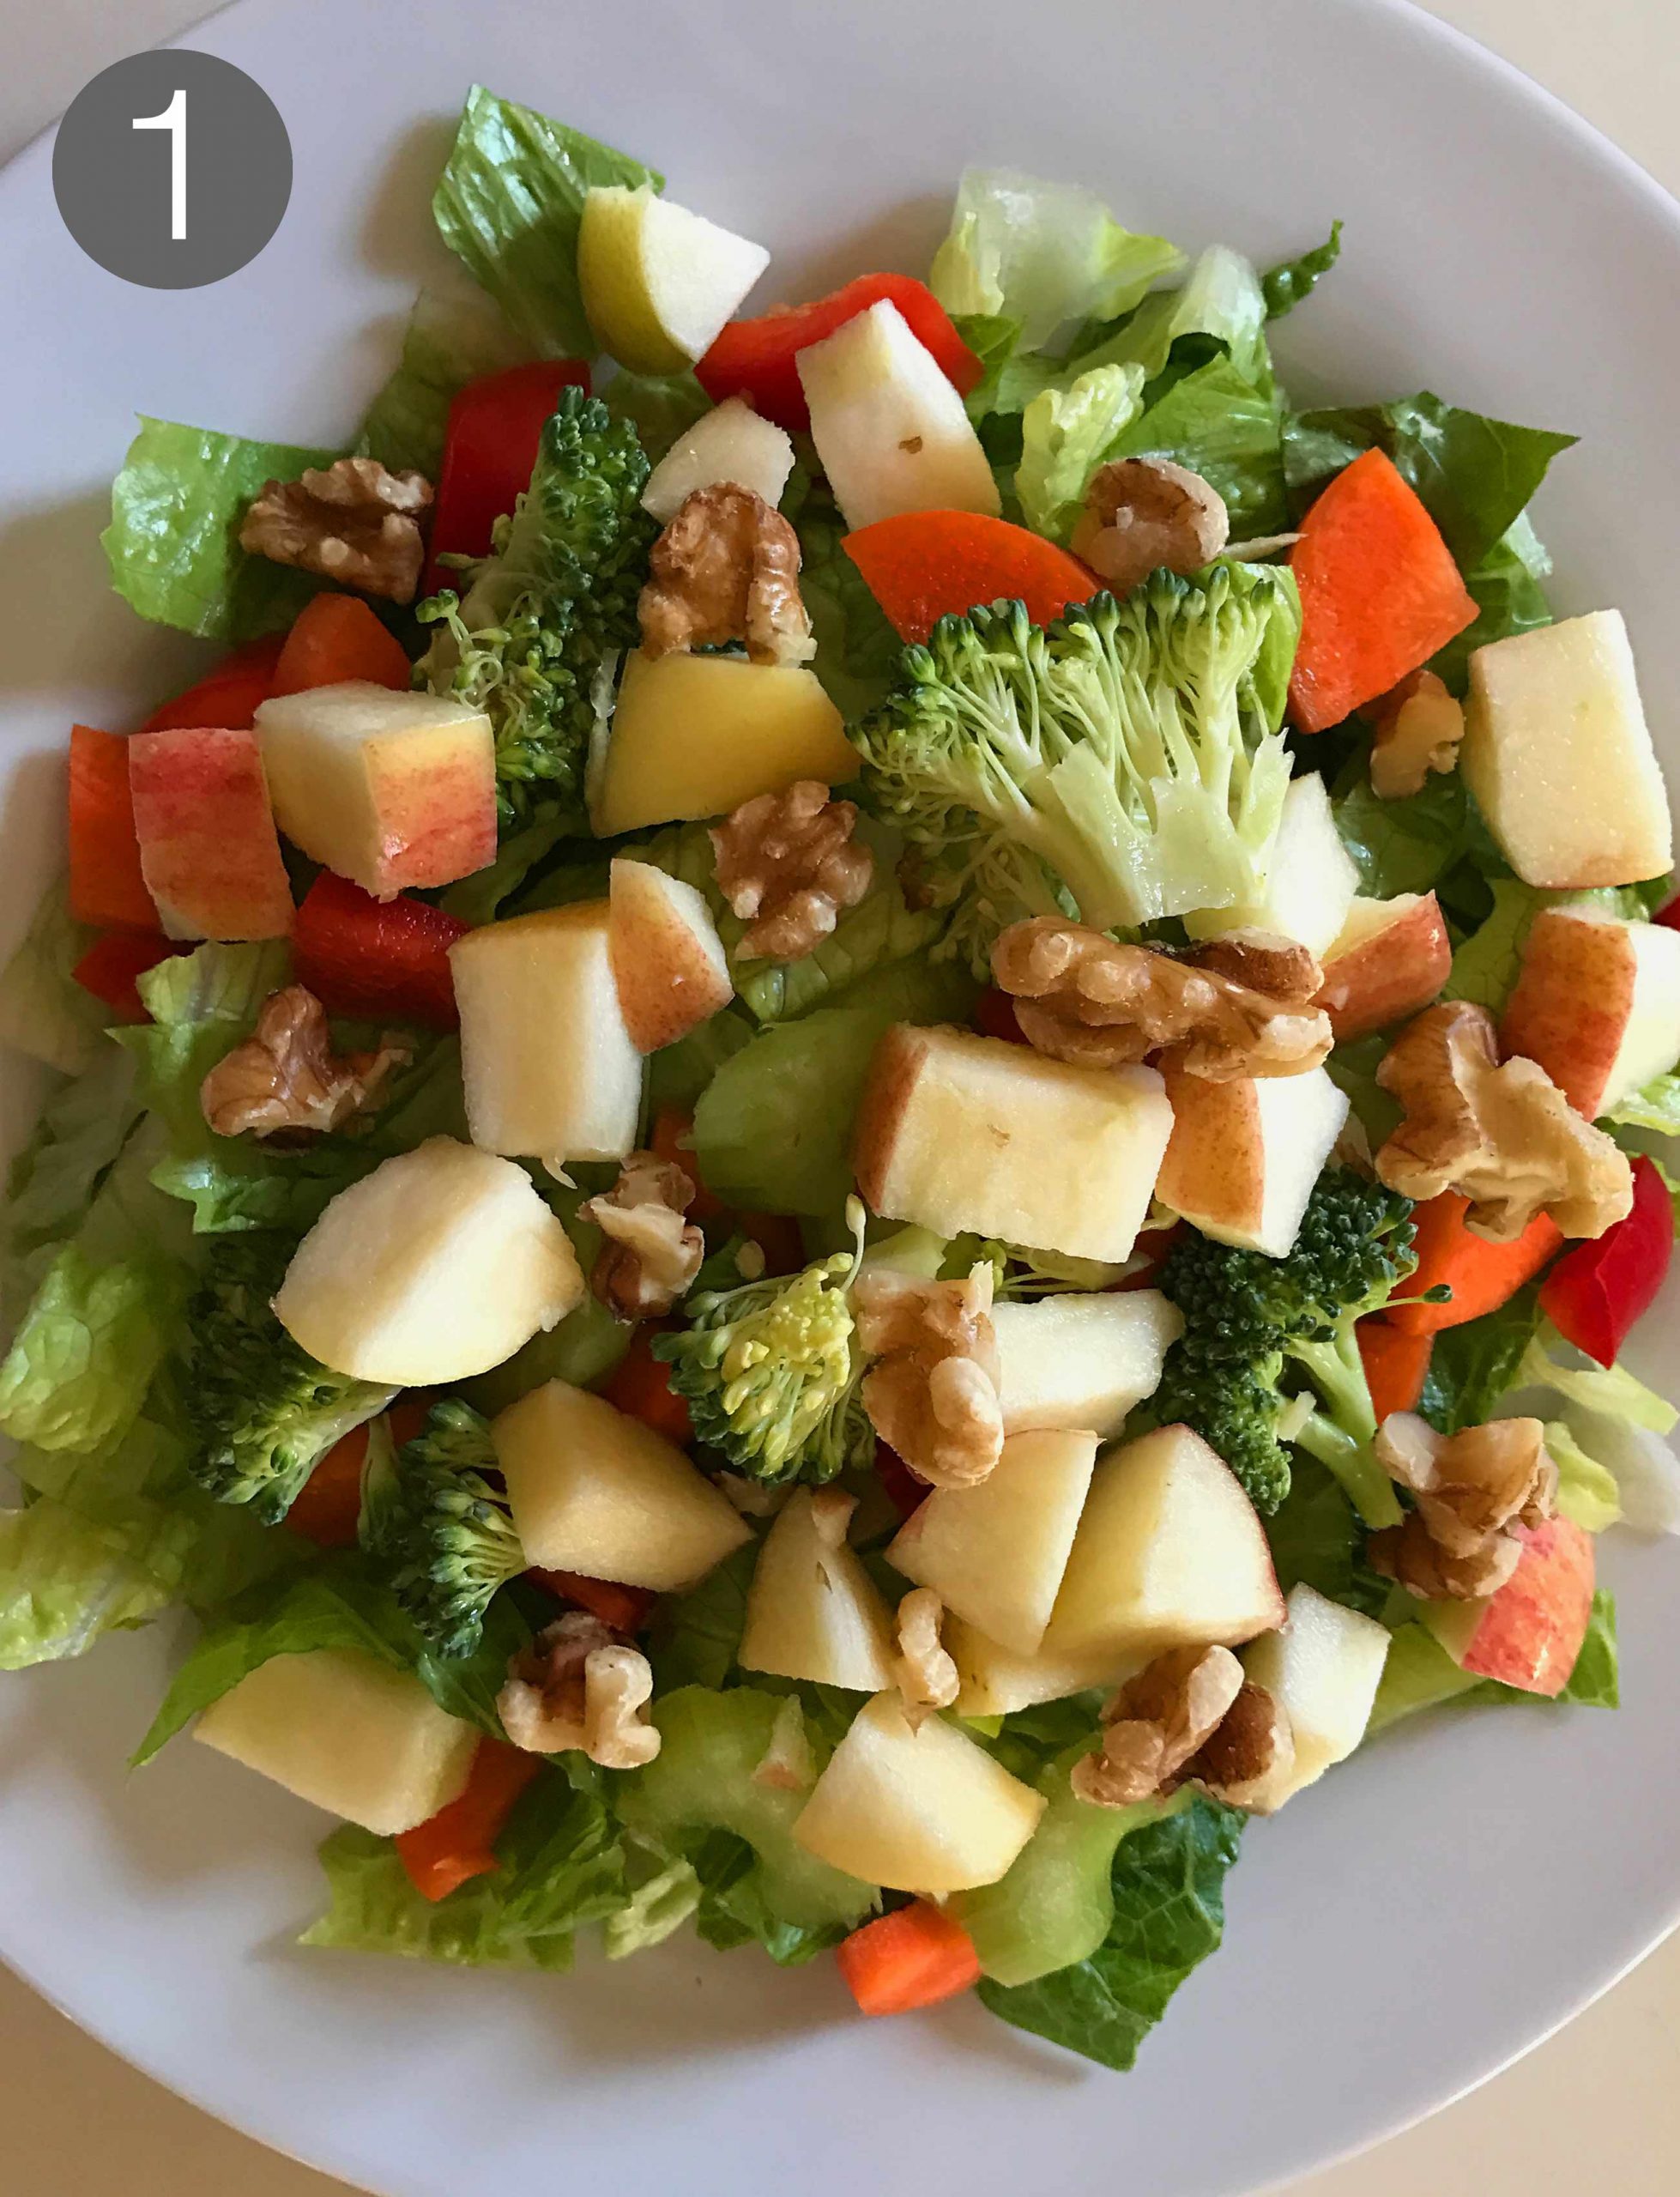

Left to right: (1) JPEG 2600×3400 pixels reduced to display at 214×280 pixels, 685K (file size much to large); (2) GIF file format (poor image quality); (3) JPEG 214×280 pixels 16K (good balance of file size and image quality for standard monitors); (4) JPEG 428×560 pixels reduced to display at 214×280 pixels, 33K (good balance of file size and image quality for high-resolution monitors)
Photo 1 was not sized correctly. If you click on the image you will see that the physical size of the image is much larger than what appears on this web page. The image was reduced to size using the html editor when it was place on this page, rather than the way it should be done, which is to reduce its size in Photoshop before placing it on the page. (More about that in Step 5 below.) As a result, the file size is 685K — over 40 times as big as it should be to look good and load fast (on a standard monitor). Image 2 has another problem. It looks bad because it’s a GIF file format, which is usually the wrong file type for reproducing a photo with a full tonal range. At 16K it is a small file, but it looks terrible because the shades of color are stippled and banded. Images 3 and 4 are correctly optimized. If you have a standard resolution computer monitor, they may look identical. If you have a high-resolution display, image 4 will look best because it has double the resolution of image 3. (More about that later…)
Follow along as I explain these five steps to optimize web images:
Step 1: Duplicate the file to preserve your original
Step 2: Make image adjustments
Step 3: Crop (Optional)
Step 4: Sharpen (Optional)
Step 5: Save For Web
Step 1: Duplicate the file to preserve your original
This step is simple but you’ll thank yourself some day for not skipping it. Start by saving your original photograph or master image as a Photoshop document (.PSD) with a new name. This only takes a few seconds and it preserves your original image file, in case you want to start over at any point. (Note that if you don’t plan to crop your photo or resize the master image, you can also accomplish this purpose by duplicating the original image layer in your Photoshop file and working on the duplicate layer instead of the original.)
Step 2: Make Image Adjustments
Next, make any needed improvements to your image. You can adjust the image layer itself using the Image > Adjustments menu (below, left) or you can use an Image Adjustment Layer (below, right). I recommend starting with the Levels (Image > Adjustments > Levels). This tool will give you the best control over the lightness and darkness of the shadows, mid tones and highlights — it’s similar to Brightness/Contrast but it gives you move control. Then move on to any other needed adjustments like Hue/Saturation, Color Balance, etc.)
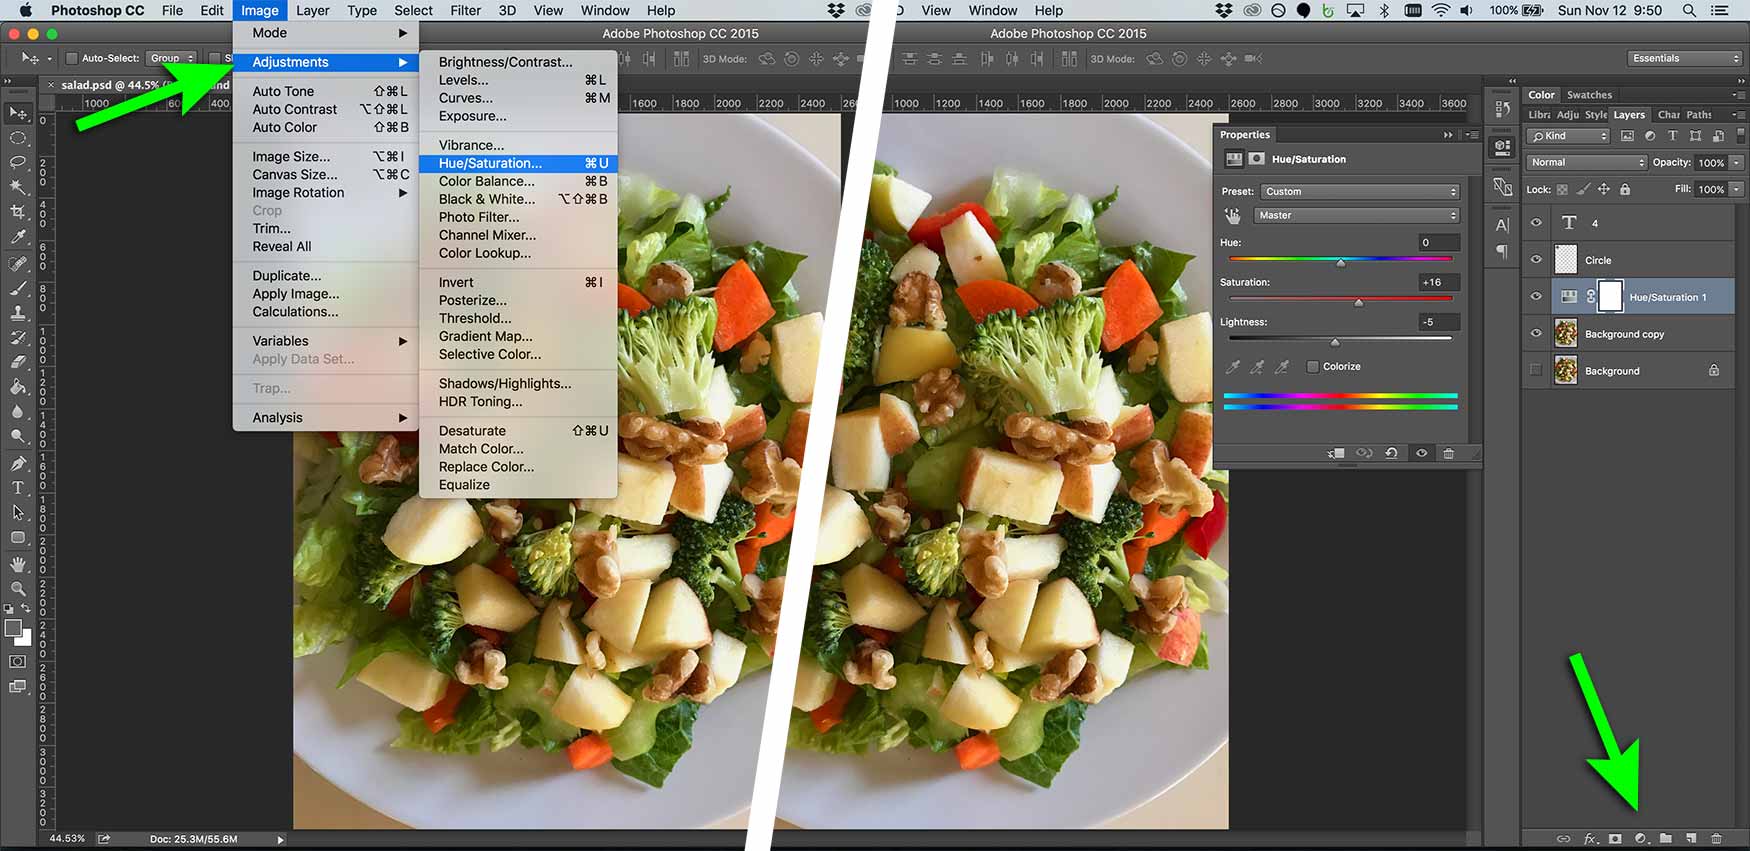
(Don’t forget to save your file after each step. You can always use the “Step Backwards” or “History” features in Photoshop to revert to a previous setting and try again.)
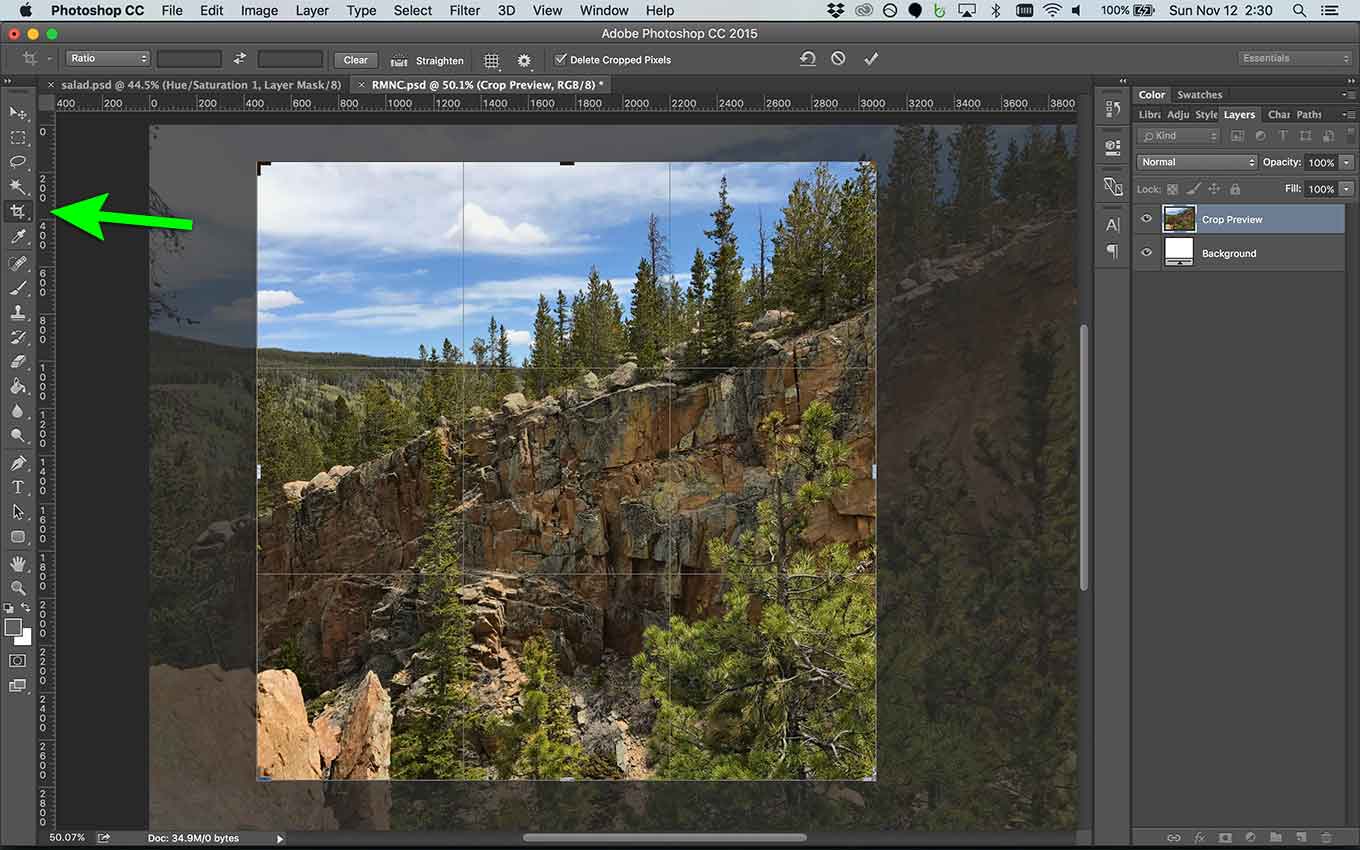
Step 3: Crop (Optional)
The next step is to crop the image. You may want to do this to improve the composition or to change the aspect ratio (for example, from horizontal to square, as with the example at right). If you don’t want to crop your image, skip this step.
Step 4: Sharpen (Optional)
Since web images that are displayed on standard resolution monitors at 72 dpi are relatively “fuzzy” or “soft,” a great way to add the illusion of “crispness” is to sharpen them in Photoshop. The smaller your image appears on the final website, the more sharpening it may need to give it some “snap.” (While this step is not really needed for high resolution monitors like Apple Retina displays, you may not know what device the viewer of your image is using. More about high-resolution monitors later…)
Without care, sharpening can easily be overdone. Take a careful look at the images below. Image 1 is the original unsharpened photo. Number 2 is sharpened properly giving is a nice “snap” compared to the original. Photo 3 is exactly the same amount of sharpening as number two, except that it is double the resolution so if you have a high-resolution display it will look much better than number two (if you have a standard resolution screen it will look the same as 2). Image 4 is sharpened too much making it seem unnatural and pixelated.
To do this in Photoshop, on the Filter menu select: Sharpen > Unsharpen Mask (this will give you more control than simply selecting Filter > Sharpen > Sharpen).
- A dialog box will open that will let you adjust the amount of sharpening and preview the effect on your image.
- Typically between 30%-50% sharpening with a Radius setting between 1-3 and a Threshold setting from 0-1 will yield good results.
- Adjust the sliders with the “Preview” checkbox selected and watch the image until you get just enough “snap” without an artificial look.
Some Photoshop users prefer the Filter > Sharpen > Smart Sharpen dialog. It has slightly different setting options. Try both and see which you like better.
Step 5: Save For Web
This is the most important step of the 5 steps described, and actually the only one that is absolutely required. There are situations where you may actually skip steps 1-4 and go directly from your original image to this step. Photoshop’s “Save For Web” feature is a powerful tool that has many settings to consider. This step actually includes a three of important steps in one:
- Set the image size to the desired pixel dimensions
- Select the correct image file type
- Adjust the settings for the selected image type to optimize file size and quality
I’ll cover these one by one. The Photoshop Save For Web window appears below. Note that you can change the number of panes by selecting the “Optimized,” “2-Up” or “4-Up” tab in the upper left. I recommend you use the 4-Up as shown here. This allows you to compare image quality for three different options against your original which appears in the upper left pane. As I continue below I’ll refer to the letters in the green circles and the arrows.
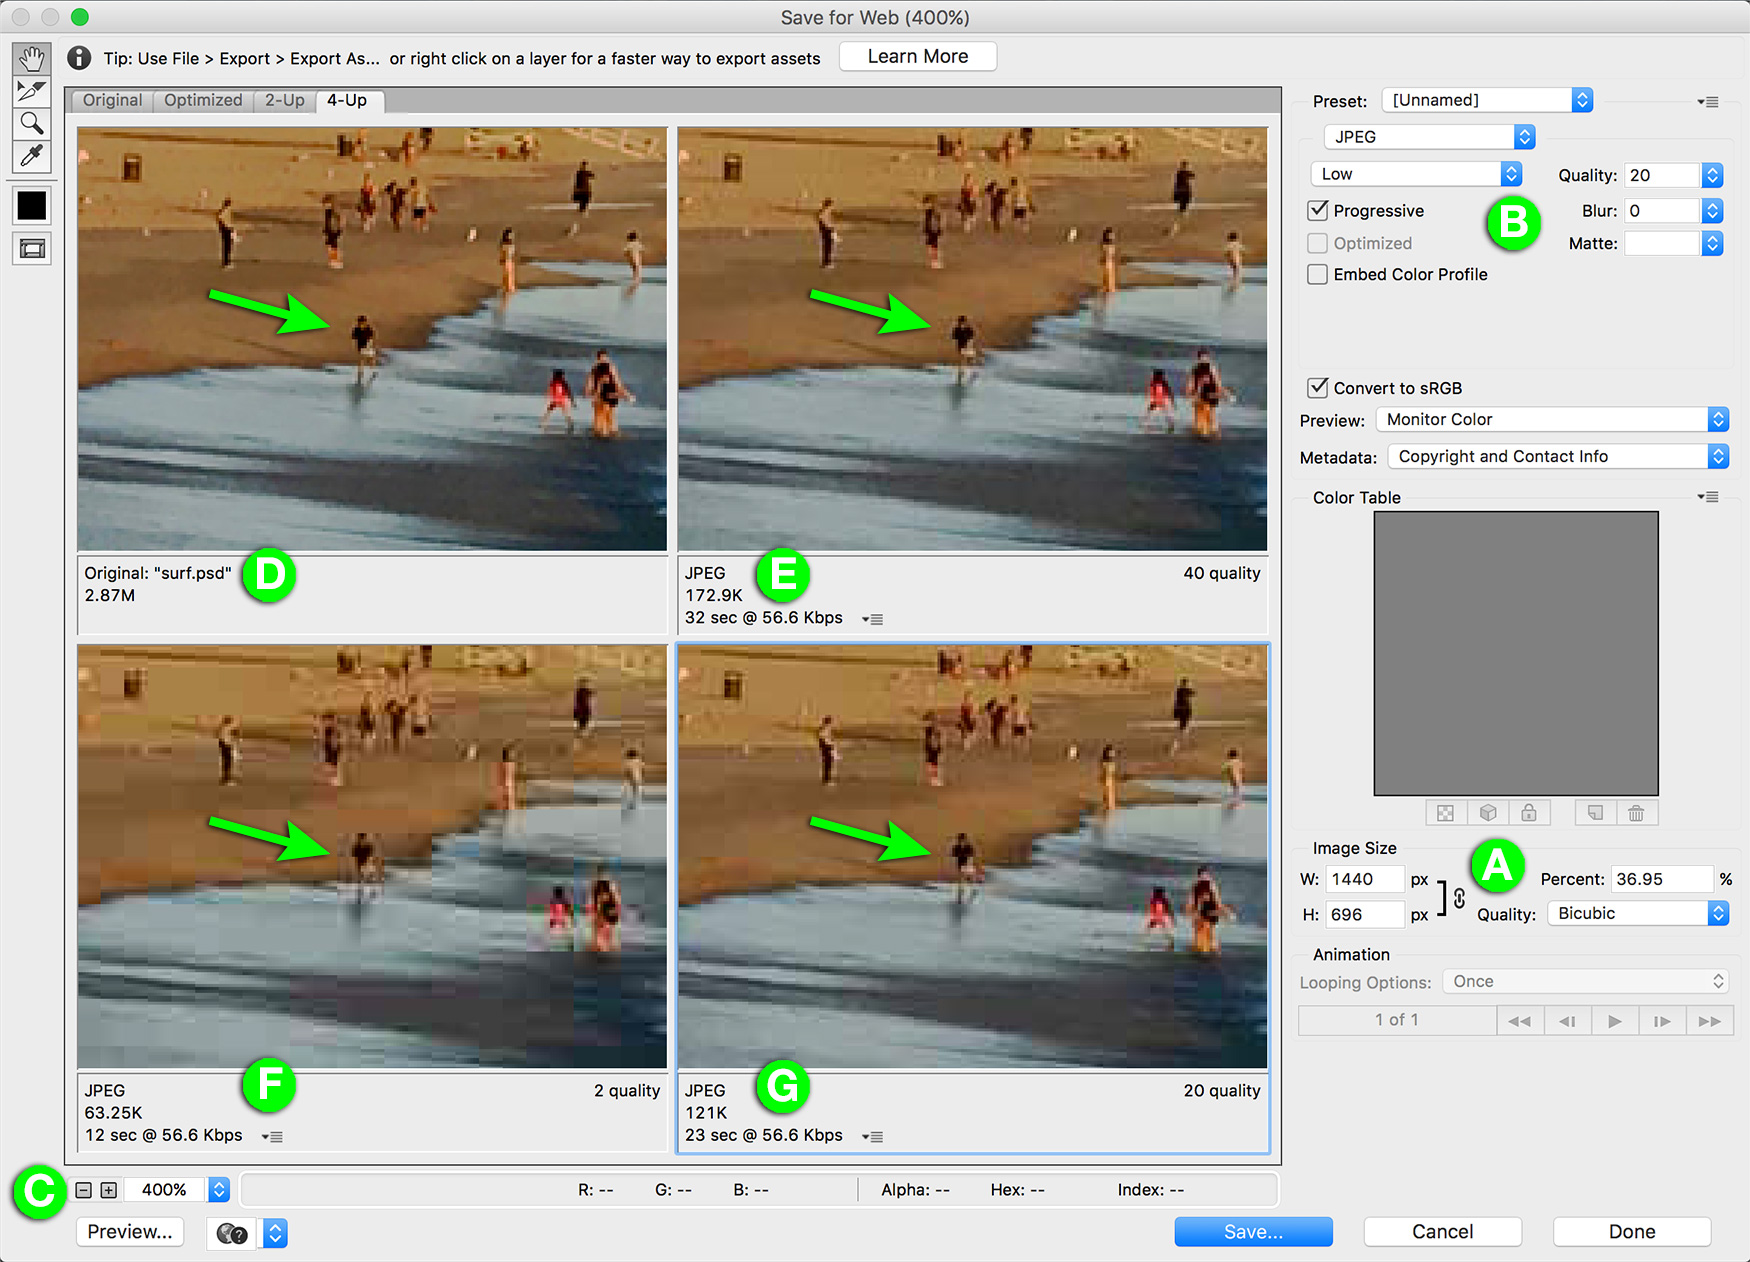
The Image Size setting is set to 1440 pixels wide (A). The image is being viewed at 400% of actual size as shown in the lower left (C). In the four preview panes: the upper left (D) is the original Photoshop file; the upper right (E) is a JPEG at 40 quality, resulting in a 172.9K file size; the lower left (F) is a JPEG, 2 quality resulting in a 63.25K file; the lower right (G, which is selected as indicated by the blue border) is a JPEG at 20 quality, yielding a 121K file. The settings in the upper right (A) affect only the selected pane.
Set the image size to the desired pixel dimensions
There are a couple of ways to get an image the right dimensions on a page. You can size it correctly before uploading it to your site, or you can upload it at its original size and then resize it when placing it on the page (using an HTML editor or another resizing tool in the CMS). Making it the right pixel dimensions before uploading it to the site is the best way because it gives you full ability to optimize the image properly. Resizing it after uploading the full size image to your CMS either fails to optimize it well, or it takes the control out of your hands as the CMS optimizes it automatically with some predetermined formula. WordPress, for example, has a built-in resizing feature that will automatically create smaller versions when you upload your original (WordPress makes “Thumbnail,” “Medium” and “Large” versions), but with no optimization control on your part.
All that as a prelude to say that the first step in the Save For Web settings is to change the pixel dimensions of the image to fit its intended use. This is done in area A under “Image Size.” You can either change the pixel width or height, or you can enter a percentage of reduction. I said “reduction” purposely because you would never want to enlarge an image here, which would make it softer. (Note that if you intend to optimize the image for high-density monitors like Apple’s Retina displays — which is highly recommended — you need to make the pixel dimensions double the size it appears on a standard monitor. More on high-resolution displays later…)
Select the correct image file type
All web images must be RGB color mode (not CMYK like print images), 72 dpi resolution, and the file format must be JPEG (.jpg), GIF (.gif) or PNG (.png). TIF, EPS, PSD and other file types will not display in most web browsers. Newer high-resolution monitors (e.g. Apple Retina display) have double the standard 72 dpi resolution, or 144 dpi. The beauty of using the Photoshop Save for Web feature is that it takes care of a lot of this for you. All files output from the Save For Wed dialog will automatically be 72dpi RGB files, regardless of the format of the original.
So then, your next step in the Save For Web dialog is to select the file type in area B following these guidelines:
- JPEG — use for full-color photographs or illustrations with a full range of color gradients (like watercolors or oil paintings or computer illustrations with gradated colors). Transparency is not possible with JPEGs.
- PNG — use for line are, clip art, logos, graphical text and other images with solid lines and little or no gradated color variation. PNGs do allow transparency. PNG-8 (8-bit color depth) files are compatible with most browsers. PNG-24 files may not display in all browsers. Animated PNGs are not compatible with all browsers.
- GIF — use for the same purposes as PNGs, but GIFs generally result in slightly larger file sizes for the same image quality. GIFs do allow transparency.
Adjust the settings for the selected image type to optimize file size and quality
Now you’ll adjust the settings for the file type you selected in area B. The Save For Web feature lets you preview up to three variations of how an image will look and determine which is best before you save it. You can set your view for 2-Up or 4-Up with the tab in the upper left of the dialog box. I recommend 4-Up so you can compare three options to the original. The original image appears in the upper left pane (D). Start by clicking on the upper right pane (E) and try an initial set of variables. The results are displayed under the image. Then you click on one of the lower panes and try different settings. You keep tweaking the settings until you have the smallest possible file size and the best possible quality.
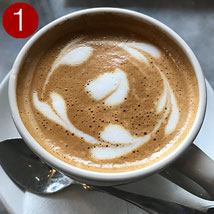
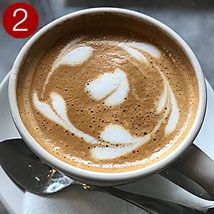
Pick out a detail in the image (such as the person on the beach shown with the green arrow in the example above) and watch how the quality changes as you change the “Quality” setting in area B. You’re looking for a setting that minimizes compression artifacts (best quality) with the smallest file size (K-weight).
In addition to comparing different quality settings for a given file type, you can also compare different file types. The Save For Web dialog box below shows the original compared to a JPEG at 40 quality, a JPEG at 5 quality and a PNG-8 set for 32 colors.
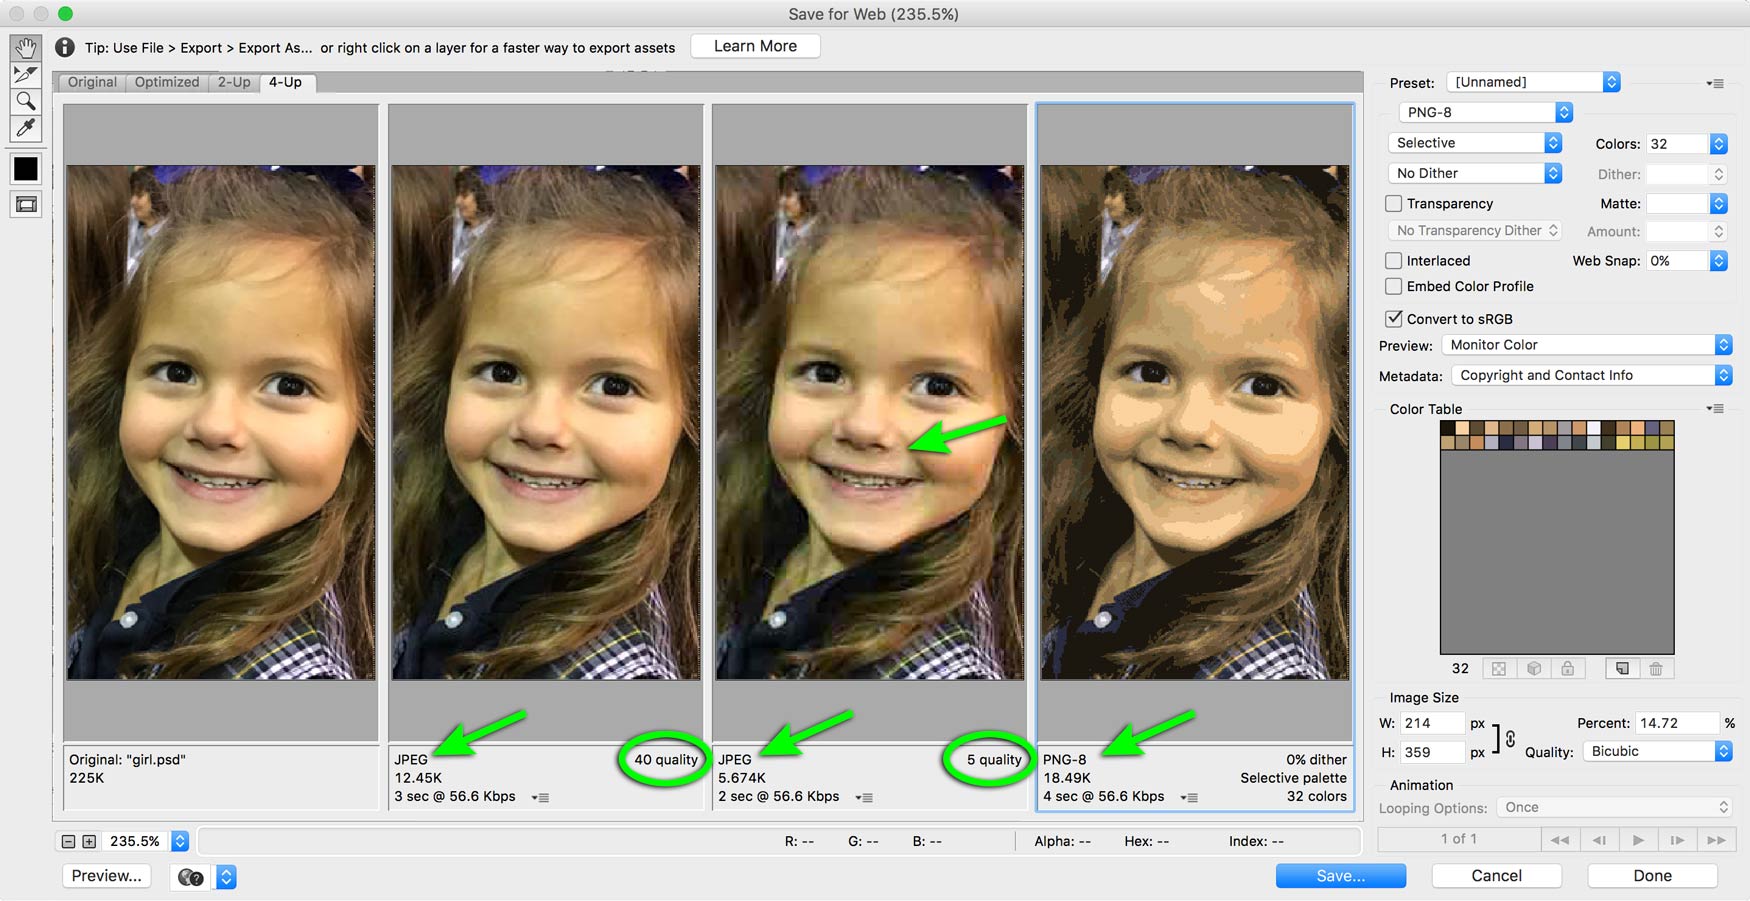
You can see that the JPEG at 40 quality is the best looking image at only 12.45K which is very small. The second JPEG at 5 quality is smaller at 5.67K but the image is starting to suffer which is most noticeable under the nose where compression artifacts are starting to appear. The PNG on the far right is the wrong file type, resulting in very poor quality evidenced by the banding of the skin tones.
Save For Web settings tips
- Photos are generally best as JPEGs, while flat art, illustrations or logos are generally best saved as PNGs.
- For typical full-color photos I find that JPEGs at 40 or 45 quality are optimal. But every photo is different and you should use your best judgment on a case-by-case basis.
- Select the “Progressive” checkbox for JPEGs (this will render your photos from blurry to clear when they load into a web browser, rather than loading them row by row from the top to the bottom of the image).
- For GIFs and PNGs, select “Diffusion” dither, 100% dither, “Selective” color, and adjust the number of colors to the lowest number that still looks good.
- For GIFs and PNGs, do not select “Transparent” unless your image has an irregular shape (not rectangular) and you want the background color to come through.
- Use PNG-8 (8-bit) rather than PNG-24 (24-bit). PNG-24 files are not compatible with all web browsers.
Bigger challenges: optimizing images for high-resolution monitors
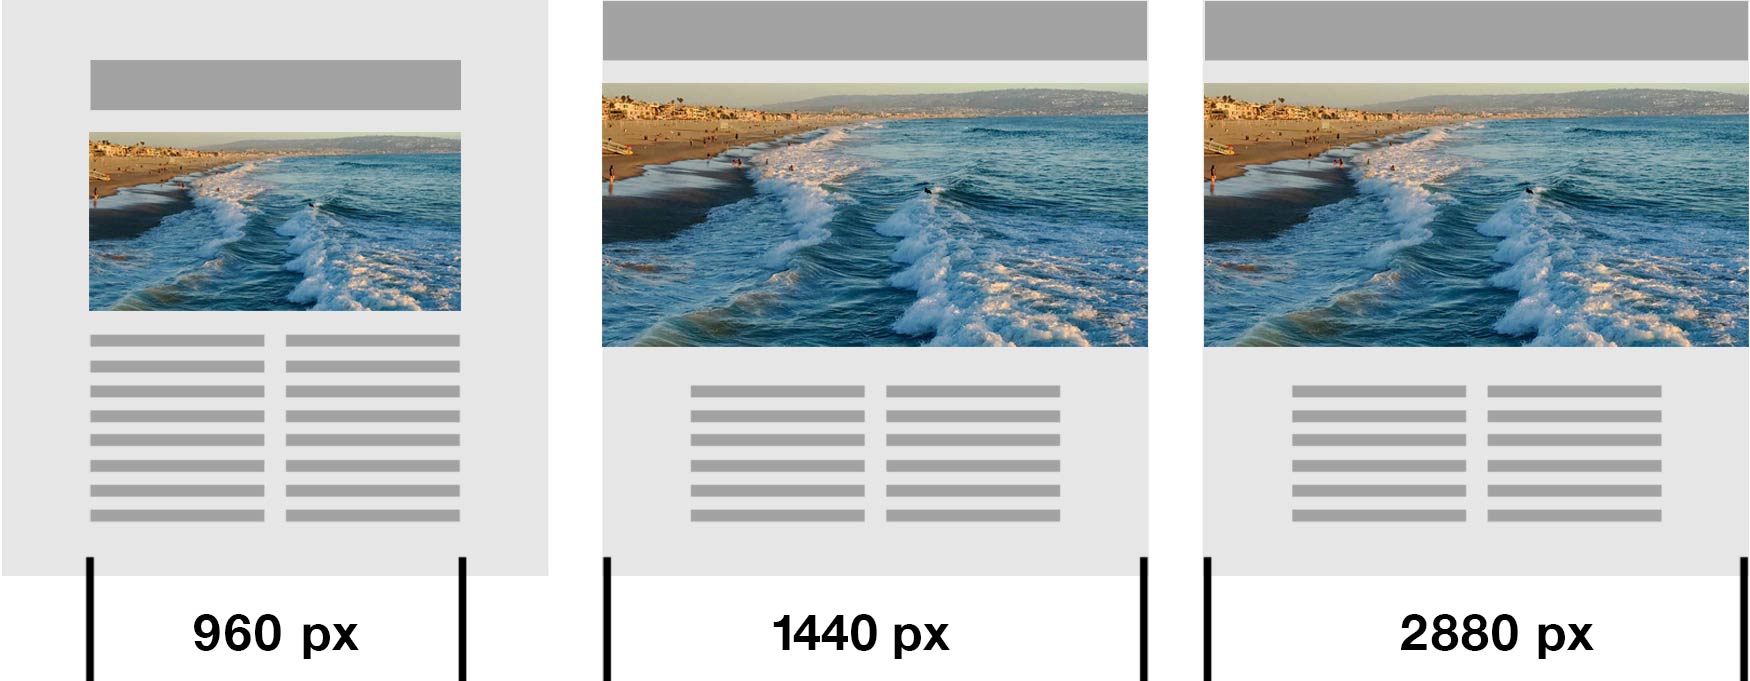
With the increase in the number of high-resolution (a.k.a. Retina, HD, high density, high-DPI) displays over the past several years, the challenge of image optimization has gotten much more difficult. Combine that with the trend in web design for using photos that fill the entire browser window, and the challenge is exacerbated further. Consider the illustration below that shows the impact on image sizes. Several years ago it was reasonable to assume the largest image on a web page might be under 1000 pixel wide. Today, images typically fill the width of the page which equates to at least 1440 pixels wide on a standard resolution screen, and double that on an high-resolution monitor. Referencing the illustration below, the page on the left has a photo that’s 960×464 pixels (445,440 pixels), the one on the far right is 2880×1992 (5,736,960 pixels) which is nearly 13 times as much data as the 960×464. If the 960 pixel image is 100K, the 2880 pixel image becomes 1.3MB. That’s too large to achieve fast page load. Therefore, you need to work on the optimization settings to get those large images down to a more reasonable size.
That usually means reducing the the “Quality” setting (area B) significantly. Instead of a Quality setting of 40, for example, which might be just right for a 1440 pixel wide image, you may need to change the JPEG Quality setting to 10 or even 5 for a 2880 pixel wide image to get the size down. (Likewise you can reduce the number on colors for a PNG or GIF from 128, for example, to 32 or 16.) This is usually ok because even though the image quality may suffer a bit when viewed in the Photoshop Save For Web dialog, the final version displayed on a high-resolution monitor is by nature still much sharper and more clear than a standard-resolution image. The photo below, for example, is 2880 pixels wide (click the image to see it full size). After careful optimization it weighs in at only 249K, which isn’t bad for an image that large.

Another way to deal with this challenge is to use a CMS that sends standard images to users with standard-resolution monitors, and sends high-resolution images to those on high-resolution displays. For WordPress there are several plugins available such as Retina @2x or WP Retina 2x. Using this technique keeps page load times optimal for the user, since there’s no reason for someone on a standard-resolution display to be served a much larger high-resolution image. (The downside is that you must create two versions of every image on your website!)
In summary, just follow these 5 simple steps to optimize web images:
Step 1: Save as “new-file-name”
Step 2: Make image adjustments
Step 3: Crop (Optional)
Step 4: Sharpen (Optional)
Step 5: Save For Web
After optimizing several images it will be like second nature! Let me know if I can help optimizing images for your website!
This post was originally published in 2013 and revised in 2017 to bring it up-to-date with the requirements of modern high-density displays and Photoshop Creative Cloud.